Introduction
So far we’ve setup a project and created a stage component. Now it’s time to define the rest our dimension data flow. To accomplish this at lightning speed we will solicit the help of a design pattern. Prepare to be transformed into an ETL ninja!
Required
Complete the steps in video 1 and 2 in this series. You should have a stage component created prior to defining the rest of your dimension data flow.
Recommended
The step we complete in this video are all done exclusively in a browser. We do recommend that you give yourself a pat on the back for making it this far!
Instructions
Follow along with the video to complete the following steps. Remember, we are here to help. Let us know if you get stuck, and we will quickly unstuck you. support@leapfrogbi.com
Step 1: Generate Data Flow
- Navigate to https://www.leapfrogbi.com/data-warehouse-automation-platform and select Login. You will be redirected to the platform login page.
- Enter the credentials you provided when your account was created.
- Forgot your password? No problem; select the Reset Password link on the login page.
- Forgot your username? Send a request to support@leapfrogbi.com. We will look it up.
- Hover the “Stage” top menu item and select “New Pattern”.
- Click the “DP-1000” button. You will be redirected to the design pattern generation form. Enter the following values.
- Source Stage Component = “Stg-Product”
- All Names Except the Dimension Name = Leave the word “Default” to use default values.
- RecordTime = Leave default value, “Exp: LoadTime”.
- All Destination Connections = Destination.
- Dim Component Name = Product
- Unknown Member = Check the box to generate an unknown member.
- Field Definition = Select [ProductID] as the Key (natural key).
- Field Definition = Select everything except SubcategoryID, CategoryID, and Modified.
- Click the “Generate Design Pattern” button.
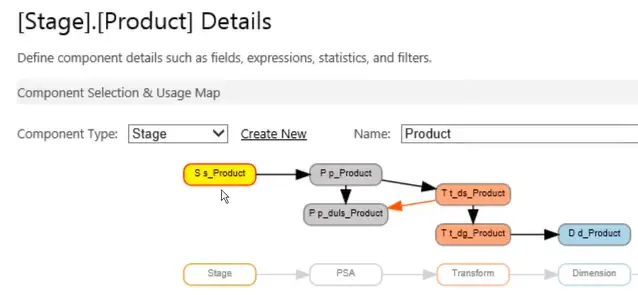
- After the pattern is generated, click the “Source Component” button to return to the stage component we used as the source for this design pattern. You will see a usage map that looks like the below image.
Step 2: Explore Design Patterns Generated Components
- Click around. You can use the usage map to navigate between components.
- Any questions at this point? It is important to understand what the design pattern just did for you. There are a few links below that you can explore to learn more. Don’t forget, we are here to help. support@leapfrogbi.com
Resources
Foundation ETL Design Pattern Video – Take a few minutes to get familiar with the foundation ETL design pattern. ETL is not a cookie cutter process, but it sure helps to have a plan before you start developing.
Foundation ETL Design Pattern Post – If you would rather read a blog post over watching the above video, then this is the link for you.
Why You Need a PSA – The persistent staging area is a cornerstone to agile data warehousing. This post will explain why.
