It is less than ideal, but at time we need to collect data that is stored in Excel. Working with Excel can be a little tricky. This post assumes that you have Excel data that is in a standard tabular format. If this is not the case, then it is likely that you will need to do some preprocessing before collecting data from your Excel source.
LeapFrogBI treats Excel just like any other OLE DB data source. This means we need to query the Excel source using SQL. Below we will step through one way to create the profile SQL together.
Step 1 – Get Profile Template
To get started we need to profile the source Excel data. In LeapFrogBI navigate to Stage > Create New. Here you will see a list of templates designed to import data from various Excel versions. Select the version that matches your data source. I’ll be using s1104 which target Excel versions 2007 and later.
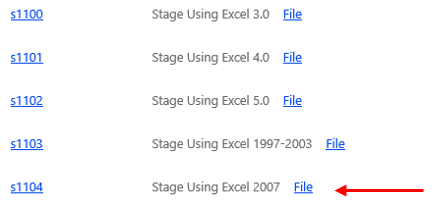
Download the profile package for the selected template type and save locally. Add the profile package to an SSIS project in Visual Studio. Be sure to use the version of Visual Studio that correlates with your project’s target SQL Server version.
Step 2 – Update Connection Manager
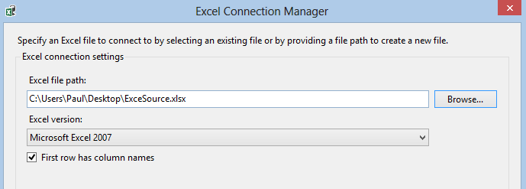
Open the profile package and edit the “Source” connection manager. Here you will define the location of your Excel file and designate whether the data to be collected contains header rows or not. Be sure the location selected is accessible to the SQL Server instance where your project will be deployed.
Step 3 Provide Source SQL
Now we need to provide a SQL statement that describes the data to be extracted. The easiest way to generate this SQL statement is to use the SSIS built in designer. If you have already created your SQL statement in other ways, then skip to the next step.
To start the SSIS SQL designer first go to the data flow tab and open the “Source” task. Change the data access mode to “SQL Command” and click the “Build Query” button. This will open the designer where you can use the GUI to build your SQL statement.
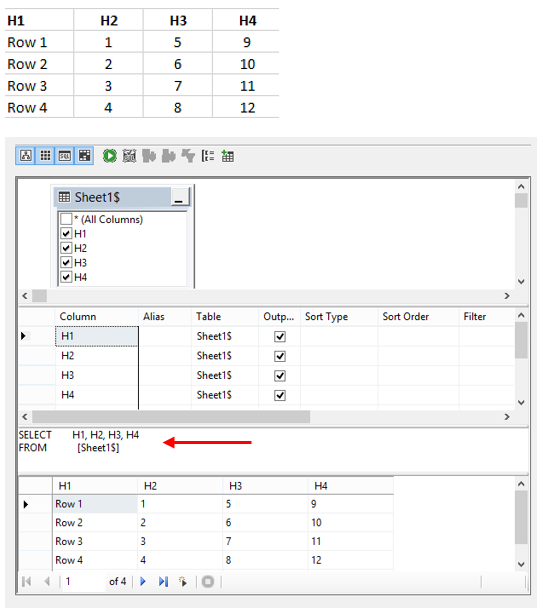
Cancel out of the designer and the “Source” task leaving it as you found it. The data source mode should be set to “SQL Command from Variable” and the variable should be set to “SQLSource”.
Now that we have our SQL statement defined we can update the “SQLSource” variable expression. This expression contains the exact SQL statement what will be executed when the Stage component is run.

Step 4 – Verify the Profile
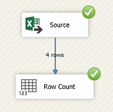
We need to execute the package to be sure our profile is valid. Prior to doing so, navigate to the data flow tab and open the “Source” task. This will ensure that the SQL statement is evaluated and the metadata updated such that it reflects our newly provided statement.
One quirky thing about working with Visual Studio is that you will likely need to close and reopen the package for the connection to succeed. Otherwise, the connection to Excel that was established when opening the “Source” task prevents a new connection from being established. Worst case scenario you may need to restart Visual Studio all together. The good news is that you only need to deal with this during profiling, and LeapFrogBI will handle it from then on.
Step 5 – Upload Profile & Create Stage Component
Now that we have a profile package defined we can go back to LeapFrogBI and create our stage component. Go to Stage > Create new and select the template of interest. This brings you to the “New Component Header” page where you will give you component a name and upload you profile package.

Like all source data we need to define a source connection. The easiest way to do this is to leave the source connection drop down set to “Create New”. This will generate a connection component based on the “Source” connection manager definition in your profile package. Otherwise you will need to go to Connection > Create New, select the correlated connection template, define the connection properties, and edit the stage component connection to point to the newly created connection. If you choose to create your connection manually, be sure that it matches the profile package including the option for “Headers Row” which must be checked if your source profile has “First row has column names” checked. You can reuse Excel connections if you are extracting multiple blocks of data from a single excel file. Consider the workbook to be equivalent to a database and Sheets/NamedRanges to be tables or views.
All Done
Navigate to your new stage component details to see the field list definition. Excel source data types can be a little tricky, but you will find plenty of details by doing a little googling.

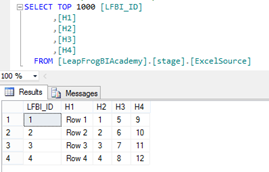
After deploying your component your Excel data will be in a stage table. Use this data just like any other data source from this point forward.
A Few Hints
If you have more than one Excel file with the same exact schema, then you can use the Multi File Stage component to collect data from all of the files while using a single profile package.
It is often faster to use the bulk profile generator (download from stage > bulk profile > profile generator) if you have more than a couple source files.
Visual Studio will set the source file to “Read Only” when you are working with your profile package. Be sure to close Visual Studio prior to executing the stage component.
When writing SQL to extract data from Excel you can use the sheet name (syntax = Sheet1$) or a named range in the from clause. If possible, use a named range to explicitly define the data range in scope. As with all source SQL avoid using Select *. Explicitly reference the source fields.
You can parameterize your source SQL just like you would do with any other profile query. In the SQLSource expression refer to other variables like this: ”Select H1, H2, H3, H4 from [Sheet1$] where Row1 = ”˜” + @[User::VariableName] + ”’
