LeapFrogBI makes collecting data from an ODBC Data Source a simple process. Profile your source and stage your profiled data. Parameterize your profile query to setup dynamic extraction criteria.
Lots of Options
Both SQL Server 2008R2 and SQL Server 2012 LeapFrogBI projects provide ODBC support. SQL Server Integration Services 2008R2 offers ODBC connectivity through an ADO.Net connection. SQL Server Integration Services 2012 offers ODBC connectivity via an ADO.Net connection as well as a native ODBC connection. Using the native ODBC connection in 2012 will typically offer the best performance & easiest setup. You also have the option to use a linked server in both SQL Server 2008R2 & 2012 projects. A linked server may perform better than an ODBC via ADO.Net connection in some cases.
When collecting data from an ODBC source be sure to install the required ODBC 32 bit driver. You then have the option of providing Data Source Name (DSN) or a DSN-less connection string.
Collect data from MySQL using ODBC
MySQL is a very popular open source relational database. The following steps demonstrate how to profile & stage data that has been collected from MySQL. Drivers are currently available at this location. http://dev.mysql.com/downloads/connector/odbc/
Keep in mind that the below described steps will manually create a profile package. It is often a much simpler process to use the bulk profile utility (download from Stage > Bulk Profile > Profile Generator) to generate your profile packages. You can then upload the packages in bulk to LeapFrogBI to create stage components.
Step 1 – Download Profile Template
In this example we will be creating a Generic ODBC via ADO.Net profile to be staged in a SQL Server 2008R2 database. If you are deploying to a SQL Server 2012 database, then you also have the option of using the Generic ODBC template which is the preferred method.

Navigate to the Stage > New Component page and click the ”File” link to download the Generic ODBC via ADO.Net template.
Step 2 – Setup Connection
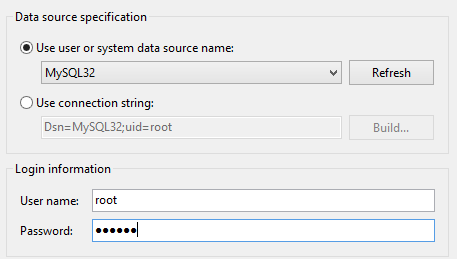
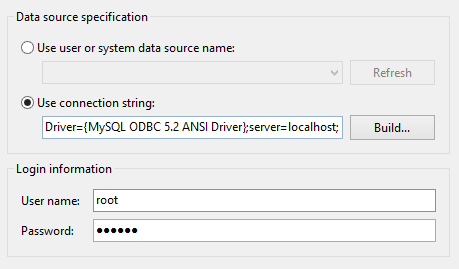
You can either setup a DSN or DSN-less connection. If you are setting up a DSN connection, then you first need to create a 32 bit System DSN. Control Panel > Administrative Tools > ODBC Data Sources (32 bit). Some 64 bit operating systems may not include the 32 bit DSN option, so you may need to open the administrator directly at Windows\System32\odbcad32.exe.
Now setup the “Source” connection in your downloaded profile template such as the following.
Sample DSN based connection string
Dsn=MySQL32;uid=root;Password=myPassword
Sample DSN-less connection string
Driver={MySQL ODBC 5.2 ANSI Driver};server=localhost;port=3306;database=world;user=root;option=3;uid=root
Step 3 – Setup Profile Query
Create a query which selects the data to be extracted from your MySQL database. Optionally, parameterize the query to dynamically extract data by using LeapFrogBI statistics. Set the SSIS User::SQLSource variable’s expression equal to your parameterized query.
“SELECT ID, Name, CountryCode, District, Population FROM world.city WHERE id > ” + @[User::MaxID]”
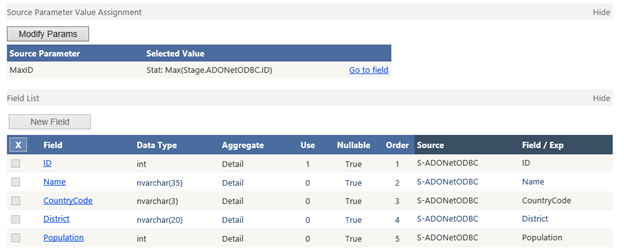
Optionally, rename variables that are used as query parameters to a descriptive name (MaxID). Do not rename the SQLSource variable as this is used to detect your profile query when parsed by LeapFrogBI.
Step 4 – Refresh Metadata
The purpose of the profile package is to detect and validate the source system’s metadata. This information (field names and data types) will be uploaded to LeapFrogBI providing a known valid starting point for development.
The MySQL ODBC driver does not work well with SSIS’s ADO.Net Source metadata refresh feature. It does work great with the SS2012 ODBC source, however. To get around this limitation we will manually initiate the metadata refresh. First, close and reopen the profile package. This causes the SQLSource expression provided in step 3 to be evaluated. Next, right click on the “Source” component in the “Source Profile” Data Flow Task and select “Advanced Editor”.
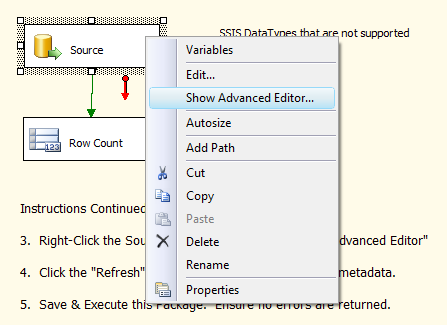
On the “Input and Output Properties” tab click the “Refresh” button. This causes the SQLSource query metadata to be collected. Warning messages may be displayed, but the metadata will still be refreshed. Click on the “Column Mapping” tab to view the collected field and click OK to close the dialog.
Execute the package to verify that is runs successfully.
Step 5 – Upload Profile
Now you are ready to upload your profile & create a stage component. Select the s1010 template, upload the profile, and click “Save”. You now have a stage component ready to be utilized in your LeapFrogBI project. Be sure to assign statistics to profile parameters in the component details is applicable.
All Done
Do a little research on your ODBC driver before getting started. Feel free to contact us at support@leapfrogbi.com if you have any issues getting your profiles created. We work with a number of data sources and may be able to point you to the best performing driver.
